Step 01
Capture what you already know
Before asking what size OS20 you need, write down what you ride now. The best starting point is a bike whose behavior you can describe. Measure it yourself when possible; model names like Pro XL are not consistent enough across brands to compare on their own.
Step 02
Compare the frame, not the sticker
Start with effective top tube, then look at rear-center range, head angle, seat angle, and bottom-bracket height. The top tube and cockpit largely set your room to move. Rear center and wheelbase strongly influence how quickly the bike lifts, pumps, and settles.
A longer package tends to
- Create more room while sprinting
- Feel calmer at speed
- Require more input to manual or change direction
A shorter package tends to
- Feel easier to move underneath you
- Respond more quickly
- Feel cramped or nervous if taken too far
Those are tendencies, not promises. Fork offset, bar position, tire size, rear-center setting, and rider technique can change the result.
Source noteSupercross currently lists its OS20 RS7 in Pro XL, XXL, and XXXL with top tubes from 21.25 to 22.25 inches—one example of why the actual dimension matters more than the label. View manufacturer geometry ↗
Step 03
Check the full wheel envelope
An OS20 rim uses a 451 mm bead-seat diameter, but the space a wheel occupies depends on the mounted tire’s width and outside diameter. A frame or fork needs room for the actual tire, not merely the rim label.
Narrow 20 × 1⅛ race tires and wider OS20 tires can share the 451 bead-seat diameter. Rim width, tire width, inflation range, frame clearance, and intended use still need to agree.
For the fork, record axle-to-crown length as well as clearance where the tire passes the inside of the crown. A fork can be tall enough but too narrow for a 1.75 or 1.85 tire. Ask the frame and fork maker for the maximum approved tire, then leave practical clearance for wheel flex, debris, and manufacturing variation.
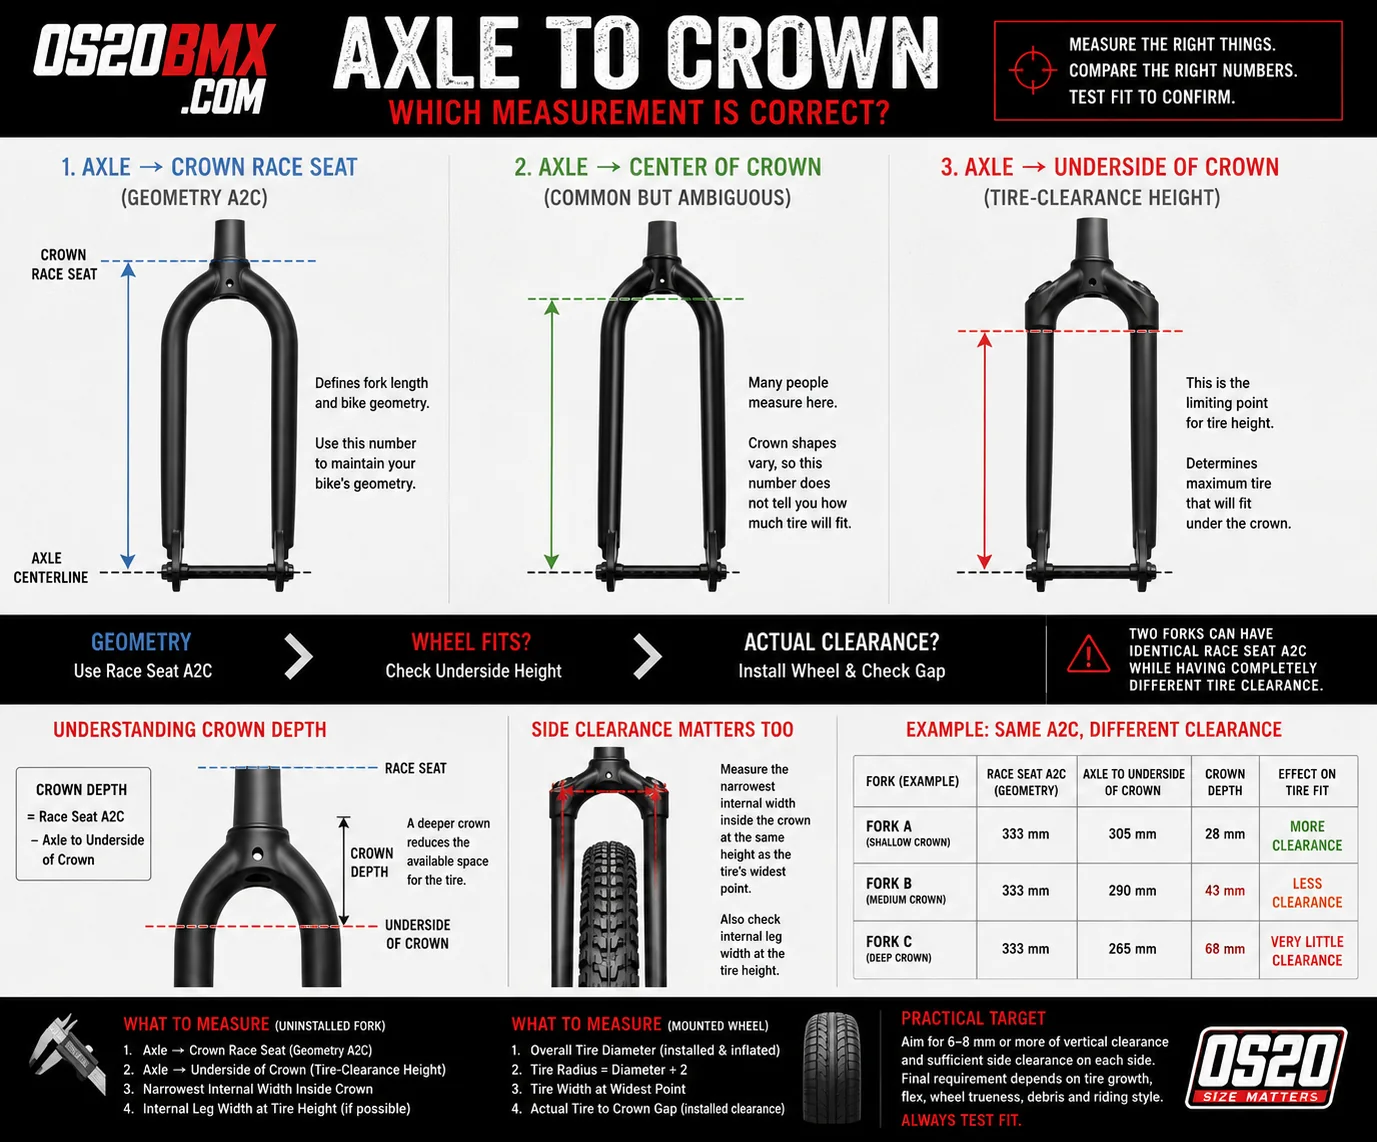
The dimensions in the comparison table are illustrative examples, not specifications for a particular fork. Follow the frame and fork manufacturer’s limits, then test the mounted wheel and inflated tire.
Open the full-size diagram ↗Step 04
Tune the contact points last
Once the frame and wheel system are correct, use stem length/rise, spacer stack, bar height/width, lever position, and crank length to refine the fit. Do not use an extreme stem or bar position to rescue the wrong chassis.
Bars affect leverage and where your weight sits relative to the front axle.
Stem and spacers make useful small corrections; large corrections are a frame-fit warning.
Cranks and gearing affect clearance, cadence, rollout, and how the bike leaves the gate.
Step 05
The shop-counter worksheet
Copy this into your phone. Fill it out before contacting a manufacturer, bike shop, or seller.